 unique fashion


).jpg)
detail of jumpsuit pattern
Basic Jumpsuit Pattern
A jumpsuit s a versatile and stylish garment that combines a top and trousers into one piece. It’s a popular fashion choice due to its comfort, ease of wear, and ability to be dressed up or down for various occasions. Creating a basic jumpsuit pattern is a fundamental skill in fashion design, providing a foundation that can be customized and adapted into various styles.

You’ll find the process easier, if the two of them have a similar amount of ease. For example here, the bodice has 2cm of ease at the underarm line and the pants have 2cm at the hipline.
The bodice should also have 2 darts, so don’t use one that has both darts united.
Uniting the Pieces
The jumpsuit pattern isn’t actually difficult at all, you just attach these two together at the waistline and blend the seams! However you do need to leave some room in between, or the jumpsuit won’t be very comfortable to wear…
Here’s how, starting from the front-piece:
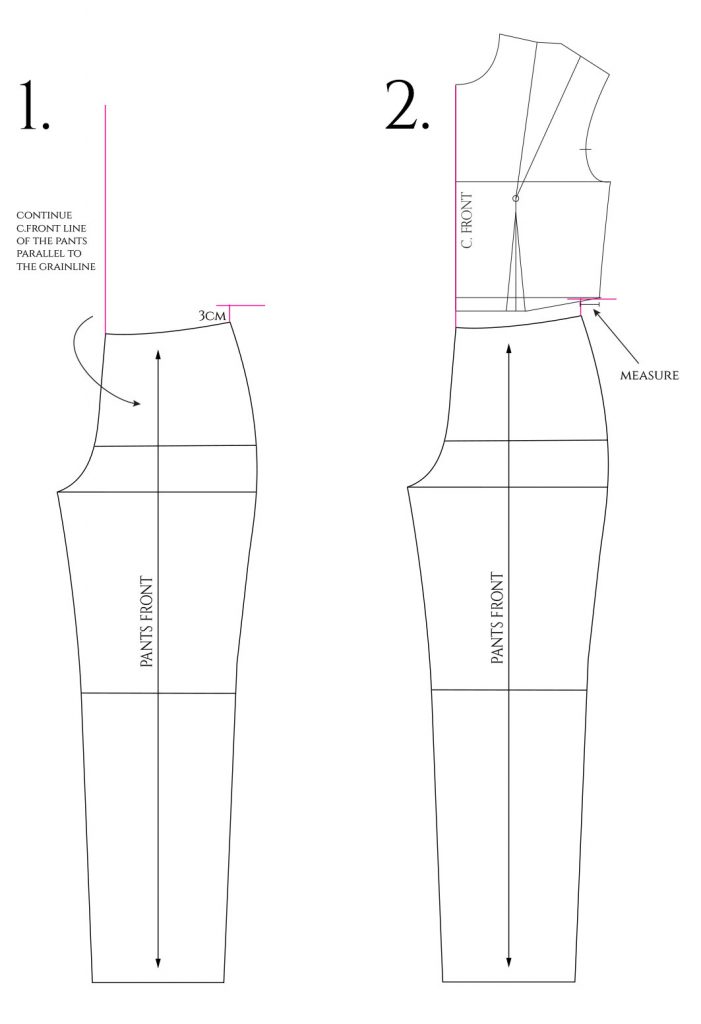
1. Continue the c.front line of the pants straight up, parallel to their grainline. Do the same at the side seam, but only for 3cm /1,2in. Then draw a little guideline at a 90º angle.
2. Place the bodice front piece so that it’s exactly at the c.front line you just drew, and the side seam ends up on the guideline (3cm above the pants’ waistline).
I’ve found 3cm to be enough, but feel free to add more if you want.
Measure how much the bodice side seam extends over the pants side seam.
Now let’s do the back-piece:

1. Continue both c.back and side seam of the pants 3cm /1,2in upwards, parallel to the grainline.
Draw a guideline on top of the one at c.back, whereas to the side seam you’ll add the measurement you got previously from your front piece in a 90º angle like in the picture.
2. Place the bodice back piece so that it matches the point you measured at the side seam, and the c.back is on the guideline.
Blending
The final thing to do, is to blend the seams.

Start by drawing the new waistline in the middle of the empty space between the bodice and pants.
This will be the point where you can add more space in case you feel that your jumpsuit is lengthwise too tight btw.
If your pants don’t have a dart in the front like here, continue the bodice dart downwards. If it does, do like I did with the back piece; find an in-between solution to unite the two darts.
Decide how fitted you want the waist to be, and draw the new side seams.
You might also need to blend the c.front and c.back seams a bit.
This is the final, basic jumpsuit pattern. In case you’re wondering why the back piece is slanted, it’s because you need more length at the c.back and this is built in the pants block, so you should automatically get a similar result.

Next I’ll show you a few simple examples on how to modify the basic pattern.
Jumpsuit pattern, version 1
This version is united at the waistline, which means there has to be a seam both at the c.front and -back. I chose the opening to be at the front.

There are some limitations to the rotation of the darts because the bodice is united to the pants, so I just rotated the bust dart to the side.
I got rid of the little shoulder dart at the back and made the neckline a bit wider.
The pant legs remain basic.
The result:

Jumpsuit pattern, version 2
This time there is a seam at the waistline. It means you can manipulate the darts normally.

Well, I simply united the 2 darts and cut the bodice front on fold.
And like before, I also got rid of the shoulder dart and enlarged the neckline.
The pant legs are shorter and I made them also wider. I turned the pant darts into folds.
The result:

Comments (0)
)-(1).jpg)


Sign Up to Our Newsletter

Secure Payment


Follow Us


The Copyright @ 2026 epatternz.com All rights reserved.


